
Google Forms is useful when you need organized answers without building a full survey system.
This Google Forms guide explains how to plan a form, choose question types, adjust settings, share it safely, and review responses without making the process feel technical.
It is useful for students, tutors, event organizers, small teams, freelancers, and website owners collecting simple information online. The goal is to create forms that people can understand quickly and that you can review without sorting through messy messages later.
Start With the Reason for the Form
A good form starts before you click the blank template. Decide whether you are collecting registrations, feedback, quiz answers, requests, or contact details.
A clear form purpose helps you choose the right questions and avoid asking for information you will not use. If the form is for an event, you may need name, email, date preference, and special notes. If it is for feedback, fewer questions usually lead to better answers.
Keep the First Version Simple
Google Forms makes it easy to add sections, images, descriptions, and different question formats, but beginners should not use every option immediately. A simple form structure is easier for respondents to finish and easier for you to check later.
Start with a clear title, a short description, and only the questions needed for the next action. You can add more detail after testing the form with one or two people.
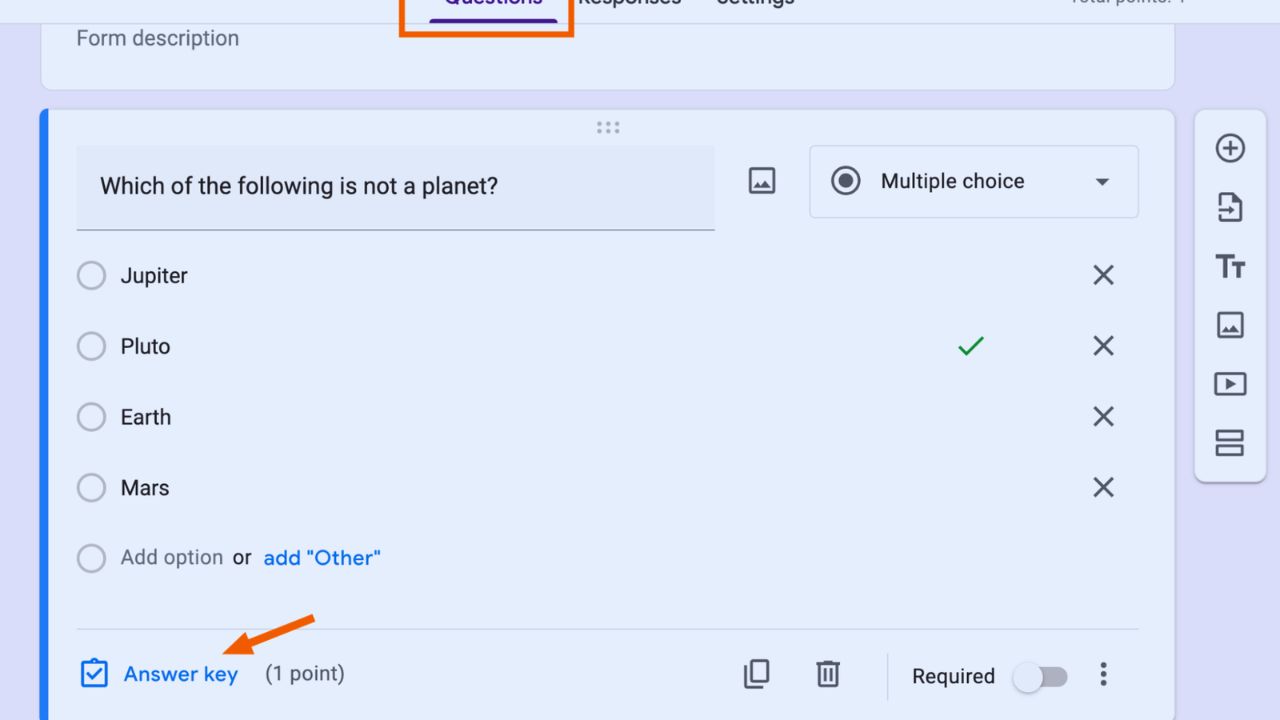
Choose Question Types Based on the Answer
Question types should match the kind of answer you need. Multiple choice works when respondents must choose one option, checkboxes work when more than one answer is allowed, and short answer fields work for names, emails, or brief details.
A careful question format prevents confusing responses. Use paragraph answers only when people need room to explain something. Long open-ended fields can be helpful, but they also take more time to review.
Required Questions Should Be Used Sparingly
Making every question required can reduce completion, especially on mobile. A required field should support the main purpose of the form, such as contact information for a registration or an answer needed for a quiz.
A practical required field habit keeps friction low. Optional questions are better for extra comments, preferences, or details that are helpful but not essential. This balance makes the form feel respectful of the respondent’s time.
Organize Longer Forms Into Clear Sections
Sections help when a form covers more than one topic. Instead of putting every question on one long page, group related questions together so respondents know where they are.
A clean section layout works well for applications, class surveys, event planning, and client intake forms. Each section should have a short title and only enough explanation to guide the next answers. Too much text can make a simple form feel heavier than it is.
Use Branching Only When It Reduces Confusion
Google Forms can show different sections based on previous answers, which is useful when not every respondent needs the same questions.
This feature can help with event choices, quiz paths, service requests, or follow-up questions. A smart answer path should remove irrelevant questions, not create a maze.
Test each route before sharing the form. If one answer sends people to the wrong place, the responses may become harder to trust.
Also Read: How to Use Digital Tools Efficiently
Check Settings Before Sharing the Link
Settings control how the form behaves after people start responding. Review whether you need to collect email addresses, limit responses, allow editing, show a confirmation message, or turn the form into a quiz.
A careful form settings review helps prevent mistakes that are difficult to fix after responses arrive. For school or work forms, also check whether access is restricted to certain accounts. A public link may not be right for every situation.
Write a Confirmation Message That Helps
The confirmation message appears after someone submits the form, so it should give useful next steps. For an event, mention when people can expect updates. For a request form, explain whether someone will reply by email.
A clear confirmation note reassures respondents that their submission went through. Avoid vague messages like “Thank you” when the person needs to know what happens next. Small details can reduce follow-up questions.
Share the Form With the Right Audience
Google Forms can be shared by link, email, embed code, or collaborator access, but each option serves a different purpose.
A simple sharing method depends on whether people are responding or helping you edit the form.
Send responder links to participants, but use collaborator sharing only for trusted people who should change questions or review setup. Mixing those roles can create accidental edits or privacy issues.
Test the Form on Phone and Desktop
Previewing the form is not enough if most people will answer on mobile. Open the form on a phone, check the spacing, answer every question, and submit a test response.
A practical mobile test helps you catch long descriptions, confusing options, or required fields that feel annoying on a small screen. Also review the test response in the Responses tab so you know the collected data appears correctly.
Review Responses Before They Become Messy
Responses can be viewed inside Google Forms as summaries, individual answers, or question-by-question results. For deeper review, you can open responses in Google Sheets and use sorting, filtering, and simple charts.
A reliable response review habit matters when forms collect registrations, survey data, assignments, or customer requests. Check responses early if the form is active for several days. Early errors are easier to fix than a full set of unusable answers.
Protect Data After the Form Closes
After collecting responses, decide what should happen to the form and the data. Stop accepting responses when the deadline passes, remove unnecessary collaborators, and avoid leaving personal information open longer than needed.
A careful data cleanup step is important for names, emails, schedules, feedback, and any sensitive details people shared. Download or store results where you can find them, then keep only what you still need.
Build Forms People Can Finish
Google Forms works best when the form feels clear from the first question to the final submit button.
Plan the purpose, choose question types carefully, keep required fields limited, test the form on real devices, and review responses before relying on them. A strong form workflow does not need complicated design or too many add-ons.
It needs a clear reason, respectful questions, checked settings, and a practical plan for using the answers. That makes the form easier for respondents and more useful for your own work during daily school or business tasks.


