
Most families have at least one shoebox of prints slowly yellowing in a closet, and almost nobody has a plan for them. Humidity, sunlight, and time are not patient. A photo that looks fine today can be unreadable in ten years.
Google Photos is the tool that solves this. But most guides treat it like a simple backup app, which undersells what it actually does once you set it up properly.
This is for the person who wants to digitize old prints, keep the library organized without constant maintenance, and share memories safely without accidentally exposing private information.
Digitizing Old Prints Without Ending Up With Glare-Ruined Scans
The advice you’ll find everywhere is to use a flatbed scanner. I’d push back on that for most people.
My take is that the PhotoScan app from Google produces cleaner results than a budget flatbed scanner for prints under 8×10, specifically because the multi-frame stitching process eliminates reflective hotspots that flatbed glass creates on glossy photos. A $60 scanner doesn’t solve glare. PhotoScan does.
That said, non-glossy matte prints digitize cleanly with just a camera and good light.
Shooting matte prints without a scanner
Place the print on a flat, neutral surface near a window. Use bright, indirect light. Never shoot in direct sun because the contrast blows out shadow detail.
Hold your phone or camera parallel to the print, not at an angle. Tilting even slightly creates keystone distortion that makes edges converge. The goal is a flat plane capturing a flat plane.
Using PhotoScan for glossy prints
Launch the app, frame the print, and tap the shutter once. The app shows four dots around the image. Move the phone over each dot until it fills. That multi-angle capture is what kills the glare.
The app stitches the frames into a single flat, high-resolution file and removes edge bleed automatically. After finishing a batch, send files directly to Google Photos, where they’ll live alongside your recent mobile shots in one searchable library.
Upload workflow that doesn’t create chaos
Create one folder on your computer called “To Import.” Every finished digitization goes there before anything else happens.
Then upload in batches rather than one file at a time. This keeps timelines in order and prevents bandwidth spikes that stall large imports on slower connections.
After upload, fix the timestamps immediately. Scanned prints often inherit today’s date rather than the original event date. Use the adjust date and time option inside Google Photos to correct the year so sort order and Memories actually make sense.
The Folder and Album System That Stays Usable for Years
I think the biggest mistake people make with Google Photos is skipping album organization because search feels good enough. Search is excellent until you have 15,000 images and want everything from a specific family trip in 2003. Then you need albums.
The naming format that works: Year + Event + Location. Something like “1998 Family Reunion Sydney” is findable by any family member years later without needing context. Vague names like “Summer Fun” are searchable by nobody.
A few habits worth building into your routine:
- Add one sentence to album descriptions that includes the year, city, and a family name
- Run a monthly pass to merge duplicate face labels and delete accidental duplicates
- Close albums after 30 days to freeze the set for printing or archiving
- Export a local copy after closure so an offline version exists
On upload size: set it to Original quality if you plan to print enlargements later. Compressed uploads save storage, but you cannot recover details that were discarded during compression.
Make that choice once at the beginning, not after you’ve already uploaded 2,000 files.

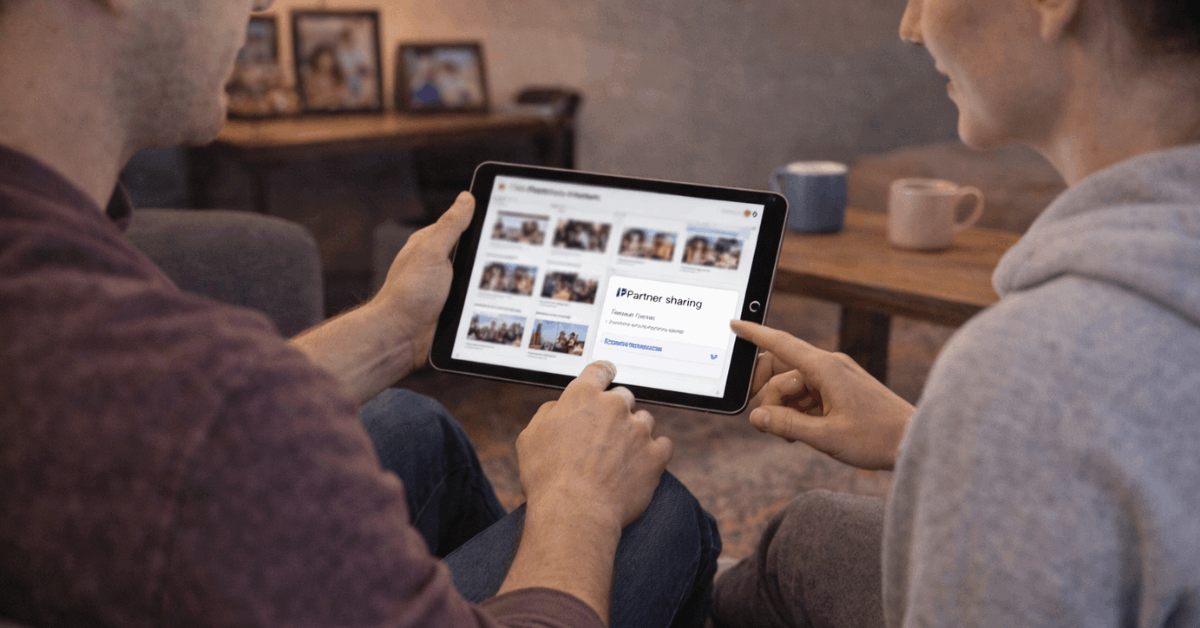
Partner Sharing and Privacy Settings: Most People Configure Wrong
Setting up partner sharing correctly
Partner sharing automatically sends selected photos to a trusted Google account without manual forwarding every time.
Open account settings, go to Photos settings, select Partner Sharing, and tap Get started. Enter the partner’s email, then set sharing rules: specific people’s faces, a start date, or both.
The filter options are what make this useful rather than intrusive. You don’t have to share everything. You can share only photos where a specific person appears, starting from a specific date.
To adjust or revoke access, return to the same menu. It takes about 30 seconds.
Privacy settings that are easy to overlook
Hide photo location data should be switched on for any link leaving your household. Location metadata in photo files reveals home addresses, school locations, and workplace routines.
Enabling this setting in account settings strips coordinates from shared links even when the original files contain embedded GPS data.
For albums containing children or private locations, turn off link-based sharing entirely. Named invitation access only. A link can be forwarded to anyone. An invitation cannot.
| Sharing Method | Best For | Risk Level |
|---|---|---|
| Named invitation | Family albums, private events | Low |
| Link sharing | Public pages, quick shares | Medium to high |
| Partner sharing | Ongoing automatic sync | Low with filters |
Named invitations are the default worth using for anything that matters.
Also read: How to Use Google Docs Without Losing Files or Ruining Your Formatting
Two-step verification is non-negotiable
Your Google account is the front door to your entire photo library, your email, and your documents. Two-step verification adds a required code or prompt after your password. If someone gets your password, they still can’t get in.
This applies to the entire Google account, not just Photos. Enable it once, then store backup codes somewhere offline. Replace any outdated recovery phone numbers while you’re in there.
Embedding and Printing: Getting Photos Off the Platform Usefully
The embed workaround that actually works
Google Photos doesn’t generate native embed codes for websites. The practical path: move the file to Google Drive, set visibility to “Anyone with the link,” open it in a new window, expand the menu, and select Embed item to generate HTML. Paste that code into your site’s editor.
For albums, create a share link in Google Photos, then paste it into a trusted album-to-embed tool to produce responsive slideshow or grid code.
Always test the embed in an incognito window before publishing, especially on school or enterprise domains that may block external access.
Keep file names neutral. Remove personal details from descriptions before anything goes public.
Printing physical copies that will actually last
Google Photos integrates with print partners that pull images directly from your cloud library, which removes the step of downloading and re-uploading files to a print service.
Before ordering, check resolution warnings inside the print editor. Original-quality uploads handle large-format prints cleanly. Compressed uploads may show pixelation at sizes larger than 5×7.
After your book or prints arrive, annotate endpapers with dates and names. Future family members will not know who the people in the photos are. You do. Write it down now. Store printed books upright, away from direct sunlight, to prevent warping and fading.
Quick Fixes for Sync and Upload Problems
Most upload stalls have one of four causes:
- Insufficient storage: Check account storage before starting a large batch
- Background permissions on mobile: Battery saver settings often block background sync
- Roaming restrictions: Mobile data roaming can silently block uploads while traveling
- Connection interruptions: Pause and resume backup to refresh a stalled connection
For face label problems, open the image, select the mislabeled face, choose “remove mistaken name,” then add the correct label. The more corrections you make, the better the automatic detection performs across the rest of the library.
After long scanning sessions, organize files locally first, then upload in batches. This prevents out-of-order timelines and keeps the process manageable on slower hardware.
Questions People Ask About Google Photos Organization
Q: How do I stop Google Photos from using up all my storage? Set upload quality to Storage saver for everyday phone photos and reserve Original quality for scanned prints you may want to enlarge later. You can also periodically delete blurry duplicates and screenshots that have no long-term value.
Q: Can I share specific photos with one person without sharing my whole library? Yes. Partner sharing lets you filter by face, date, or both, so only a subset of your library flows to the other account. For one-off sharing, create a shared album and invite only the specific person rather than sending a link.
Q: What happens to my photos if I lose access to my Google account? This is the scenario worth preparing for now. Export an archive periodically through Google Takeout, and store a copy on an external drive or second cloud service. Treat Google Photos as your primary working library, not your only backup.
Q: Do I need the PhotoScan app or can I just photograph prints with my phone camera? For matte, non-glossy prints in good indirect light, your phone camera works fine. For glossy prints, PhotoScan’s multi-frame stitching is the only reliable way to eliminate reflective hotspots without expensive equipment.
Q: How do I keep old photo dates accurate after scanning? Fix timestamps immediately after upload using the adjust date and time option inside Google Photos. Getting this right at import time saves hours of sorting confusion later, because Memories and timeline views both depend on accurate dates to function properly.
Conclusion
The shoebox of prints sitting in your closet is not going to digitize itself, and the humidity is not going to stop.
Set up the import folder, run the first batch through PhotoScan, fix the timestamps, and name the albums properly from the start. Good habits at the beginning mean almost no maintenance later.
The library that takes a weekend to set up right is the one your family will actually use for the next twenty years.


